Sunday, April 22, 2012

Party Desserts

Going away parties are always bittersweet. You're sad to see a good friend go, but happy for them as they move on to something bigger and better! This weekend we had a going away party for a close friend of so many. It was only right to send her off with an awesome party. There were good friends and great food:).

This was a good opportunity for me to try my hand at making a croquembouche. I've been wanting to try it for a long time, and with the party's theme being "french bistro" what better chance did I have? 

I'm not going to lie, it was a little stressful. But I'm really glad I did it and it was a success! 

After a batch of screwed up cream puffs (I apparently can't count eggs) and feeling discouraged, I plowed through it and made a second batch and got to work!

Here's the link to my post with the recipe for cream puffs. I'll edit this post later today or tomorrow and add in the recipe my mom used for the pastry cream filling, it was delicious! I'm not usually a pastry cream fan but it was perfect:). Thanks mom!

I went back and forth about how to assemble it. I was initially going to build the puffs up on themselves, but as I did more research I decided to build them around a cone. That would give it the best shape, not to say you can't simply stack them, but you won't get a nice structured cone look to it.

I got 8" cake boards and a 12" Styrofoam cone at Joann's. Cut a large piece of parchment paper or wax paper and cover your cone with it.


I secured it with toothpicks on the side seam and on the top. Trim the bottom so there's no overlapping  and secure it to your base using some corn syrup.

I made the puffs on Thursday and kept them in airtight containers in the freezer right until my mom and I went to assemble it Friday night. 

Melt your chocolate in a double boiler and take your puffs out of the freezer. Using a pastry bag with a #2 tip, fill your puff. Some were a little too hard so you can use a toothpick to start a hole then get the tip in there. My mom got the hang of filling them quickly, we only had a couple explosions:). 

Take the filled puff and dip the bottom in the chocolate, coating it generously and adhere it to the cone. Work your way around the base and continue working your way up. Make sure your puffs are as close together as you can get them. If they start to thaw too much simply swap them out for new ones from the freezer and put the soft ones back in to cool down.

We put the whole thing in the fridge when we were half way up the cone, just to let it set for about 10 minutes, then continued. As you pass the toothpicks holding the wax paper down, remove them. The chocolate will seal the edges. Also, at the end I put some melted chocolate in a pastry bag and piped some into any gaps, so none of the wax paper was showing. 

I didn't count, but I had 71 creams puffs, we ate 3 and had about 10 extra...so....it took about 58 to cover the cone. 


Ta-da!

Yes, I'm dumb and we had 1 significant gap that was to small for a puff but big enough to look dumb. I don't know why I didn't put that facing the wall. But who cares! I think it came out really good. I just surrounded it with the extra puffs and did a little drizzle on top. 

I was so nervous about it falling apart but it did the opposite...it was really stuck on there! 

All in all I was really happy with it. Now I feel much more confident if I ever end up making one again, which I would like to do! It can only get easier and improve right?

I also made lemon cupcakes with a raspberry cream filling.


Courtney requested chocolate with white chocolate mousse and lemon with some fruit filling. Since I didn't think those would quite go together in one cake (ha!) I made these and ordered a chocolate/white chocolate mousse cake from Rhea at Rhea's Rockin' Cakes who I used to work with at Butterwood's.


The cake was perfection. Rhea always does an amazing job, and she did not disappoint! She made a 12" chocolate cake with three tiers of cake and two of white chocolate mousse filling. Everything was delicious about it! She rocked the piping as well. All we did was add the edible flowers right before we put it out.


I wasn't counting, but I probably got about 60-65 appropriate sized slices of cake out of it. This is a beef of mine. I can't tell you how many times I've been to a party and gotten a gigantic piece of cake that's just too big to eat, and then they run out of cake. Or, I get a sliver of cake that you can practically see through because it's so thin. *le sigh*

So that's pretty much it. There was a ton of other really great food, everyone worked so hard on this party and did such an awesome job! 

Now I'm paying for eating all those goodies:(. Totally worth it though! 

I hope everyone had a good weekend!!

I'll be back to add the recipe for pastry cream later:).

Friday, April 20, 2012

Limoncello Blueberry Cooler

With the weather being so nice today, I wanted to find a refreshing sparkling drink to have. Something cool, with a little fizz and the tastes of summer!

With tomorrows high being in the 40's I have to take advantage of the 70's today. So I'm opening all the windows, driving with all the windows down, sporting shorts ( yes, I'm wearing shorts!) and flip flops. All while enjoying this drink while I'm baking cupcakes and stressing big time over the croquembouche I'm suppose to assemble later today with my mom!

Things always seem so simple in my head...

Limoncello Blueberry Cooler


  • 1 bottle (750 ml) limoncelle liqueur, chilled
  • 1 cup sparkling water, chilled
  • 1 cup fresh blueberries
  • 5 fresh mint sprigs, crushed and extra for garnish
  • crushed ice
In a pitcher, combine limoncello, sparkling water, blueberries and mint.

Fill highball glass half way with crushed ice and pour about 1/2 cup of limoncello mixture into glass. Garnish with mint.


I made a single drink, not a whole pitcher. It was approximately 4 oz limoncello, 2 oz sparkling water and I just threw in a few blueberries and one mint leave. 

It was really delicious and I'd love to try it with different berries, or a combination of a few different kinds!


Thursday, April 19, 2012

MIA

I realize I have been missing in action lately. Matt and I have had a lot of late nights working and I just haven't gotten myself motivated to post in awhile due to sleepiness...and possibly a little bit of laziness. But I have been cooking, and I have been snapping photos. I'll try and catch up over the next week or so. Only to probably go MIA again in about a week because I'm getting my wisdom teeth out next Friday! Woo-hoo! It's the perfect anniversary present to myself lol.

I have been pinning lots of smoothie recipes so I'll probably do a round up of all of them and post it when it's all said and done. If anyone has some suggestions for filling, easy to eat foods that I can have after my wisdom teeth come out, please feel free to share!

Anyway, on to the task at hand. Actually posting a recipe:). I made these mini zucchini pancakes a couple weeks ago for something new to try. They sounded really good and I thought they'd make for a nice, easy lunch throughout the week. Well, I was right! These are really good over a spinach salad with balsamic dressing, paired with some applesauce, or topped with a dollop of sour cream and chives (and maybe bacon, you know.....because they're healthy...you can totally get away with it. ha!).

Zucchini Pancakes


You will need:

  • 2 medium zucchini, grated
  • 2 shallots, chopped
  • 1/4 cup fresh chives
  • 1/4 cup parsley, chopped
  • 1 garlic clove, minced
  • 2 eggs
  • 1/4 cup grated parm cheese
  • 6-8 tbsp whole wheat flour
  • salt and pepper to taste
  • olive oil spray
Grate zucchini using the large holes on your grater and place in a large bowl. Add the rest of the ingredients, seasoning with salt and pepper.

Heat a large skillet over medium heat and spray with olive oil. Spoon onto skillet, about 2 tbsp per pancake. Cook each side until brown. Set aside and keep warm. Continue with batter, makes about 20 small pancakes.


These things smell awesome. I'm warning you now, you'll want to devour them all. I put them by 5's in freezer bags and when I want them, I heat up a bit of olive oil in a small pan and give them a quick fry. A serving size is 5 pancakes, at 134.9 calories, 4.7 grams of fat, 16.2 carbs, 3.5 grams of fiber, 8.7 grams of protein and 2.1 grams of sugar.

Source: Skinnytaste


Wednesday, April 11, 2012

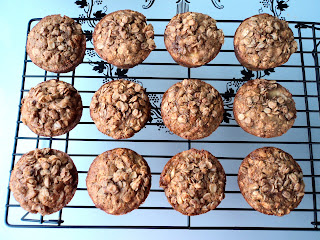
Oatmeal Banana Muffins

I saw a recipe for Oatmeal Banana Bread on a friends pinterest the other day and realized I have all the ingredients, and they sounded really yummy, so I set out to make them today. I changed up the recipe a bit and made muffins instead of a loaf. I actually don't even own a loaf pan...I may need to remedy that soon :).

These muffins are crazy good. The only regret I have is not putting chocolate chips in them. I thought of it right as I was putting the crumb topping on them :(. I'll have to add them in next time, because there will be a next time!

Oatmeal Banana Muffins

You will need:

  • 2 whole, overripe bananas
  • 1 large egg, beaten
  • 3/4 cup fat free milk
  • 1 cup whole wheat flour
  • 1 1/4 cup old fashion rolled oats
  • 1/2 cup plus 1 tbsp packed brown sugar
  • 1 tsp baking soda
  • 1 tsp baking powder
  • 1/2 tsp salt
  • 1 tsp cinnamon
  • pinch of nutmeg
  • pinch of ginger
  • 1 tbsp unsalted butter, melted
  • 1 tbsp ground flax meal
Preheat oven to 350 degrees.

For the topping: In a small bowl, combine 1/4 cup oats, 1/2 tsp cinnamon, pinch of nutmeg, pinch of ginger, 1 tbsp brown sugar and 1 tbsp melted butter. Stir to combine and set aside.

For the muffins: Mash the bananas in a medium bowl, then stir in the milk and egg. Add the flour, baking soda, baking powder, salt, 1 cup oats, 1/2 cup brown sugar, 1/2 tsp cinnamon, pinch ginger, pinch nutmeg and flax meal. This is also where I would have added mini chocolate chips if I was thinking clearly ;). I am saving those for buttermilk scones though...

Pour mixture into 12 lightly greased muffin tins, about 2/3 full, and sprinkle with the topping mixture.

Bake at 350 degrees for 18-20 minutes, or until a toothpick comes out clean. Let cool in pan for 5 minutes. Run a knife around the edges to make sure they will come out cleanly and let them finish to cool on a rack.


These smell so good and taste even better! They have just enough sweetness from the overripe bananas and brown sugar crumb topping. I really enjoyed them. I quickly added the ingredients into an on-line calorie counter and these come out to be approximately 150 calories, 2 grams of fat and 4 grams of protein per muffin, not to bad!


Source: adapted from Greatist

Sunday, April 8, 2012

Not Exactly Lard Lad Donuts

I've been wanting to purchase a doughnut pan for awhile now, and the other day at Target I finally got one, it's Nordicware! I was so excited to test it out that as soon as I got home I decided to find a doughnut recipe and make them right away.

Since I've been trying to make better choices when it comes to the foods I'm eating I figured I should try and make doughnuts that weren't full of fat and sugar. Right off the bat I knew baking them would make a difference, as opposed to deep frying them. I found this recipe on Health.com. Of course, they are not the same as a deep fried doughnut. You can't go into making these expecting that. But they were a nice treat, with more of a cakey texture then fluffy doughnut.

Baked Buttermilk Doughnuts


You will need:

  • Nonstick cooking spray
  • 1 cup whole wheat flour
  • 1 cup all purpose flour
  • 1/2 cup sugar
  • 1 1/2 tsp baking powder
  • 1/4 tsp ground nutmeg
  • 1/2 tsp salt
  • 3/4 cup low fat buttermilk
  • 2 large eggs
  • 1/4 cup honey
  • 2 tbsp melted butter
  • 1 tbsp vanilla extract
Preheat oven to 425 degrees. Coat pan with nonstick cooking spray.

Combine flours and next four ingredients (through salt) in a medium bowl and whisk together. Combine buttermilk, eggs, honey, butter and vanilla in a bowl, stirring well with a whisk. Add buttermilk mixture into flour mixture; whisk until just combined.

The recipe said to spoon the batter into the pan...yea, don't do that.  I spooned the batter in for the first batch and it just doesn't get a nice rounded look to it, it was kind of bumpy and uneven. Put your batter into a ziplock bag and cut the corner and pipe the batter into the pan until 2/3 full. 

Bake in heated oven til they spring back when touched and are golden brown on the bottom (about 8 minutes). Let cool in pan four a few minutes and turn out. Coat with toppings, if desired.

I dipped half of them with some melted nutella and sprinkles, and the other half I coated with a lemon glaze made of confectioners sugar and fresh lemon juice.


In my opinion, the nutella ones blew the lemon ones out of the water. I'm really looking forward to trying out different recipes! This is a really fun kitchen tool and for only $7!


Yum!


Source: Health.com

Plain Doughnut: 140 calories per serving
Lemon Glaze: 191 calories per serving
Nutella Dipped: approximately 220 calories per serving

The website gives more extensive nutritional information.  


Friday, April 6, 2012

Fruit Swap

The theme of the swap, put together by atasteofhomecooking, this time around was fruit. Your recipe could be sweet, savory, have any type of fruit, made in any matter. I received Strawberry Sour Cream Pie from Kate over at katesrecipebox. I was very curious about this recipe. Usually I'm very anti sour cream, it's one of those things that I'd really like to enjoy, but just can't. I was excited to see how it would turn out in a pie!

One downside about making this recipe was that this is not the time of year to get quality strawberries. I bought some at a local market and it only took eating one to return them to the store. Blech! Thankfully I was able to get some nice ones the next day, and I set out to make the pie:).

Strawberry Sour Cream Pie


You will need:

  • 1 prepared pie crust
  • 1 quart fresh strawberries
  • 1 cup flour
  •  1 1/4 cup sugar, reserve 1 tbsp
  • dash salt
  • 1 cup sour cream, not non fat
Pre heat oven to 450 degrees. Hull and wash the strawberries and cut them in half, set them aside. Sift the flour, sugar and salt in large mixing bowl. Add sour cream, blending until creamy. 


Gently fold in the strawberries.


Pour mixture into the pie shell and spread around, without packing down. There should be spaces throughout the filling. Take the tbsp of sugar and sprinkle over top.


Bake the pie for ten minutes, and then reduce heat to 350 degrees (keep the door open for a minute to allow the temp to drop). Bake for an additional 30 minutes, or until the crust has browned.


Broil the pie for 2-3 minutes to allow the top to brown. Unfortunately my broiler does not work, so I wasn't able to do this step. Instead, I let the pie cool completely and then I made some whipped cream and piped it on top, to hide the paleness hah.


I put it back in the fridge until dinner at my parents. The first bite took me aback. I wasn't sure what to think. It was creamy, it was custardy....it was...delicious!


As you can see, everyone else thought so too. I managed to polish off the leftovers over the next 3 days:).


Friday, March 30, 2012

I'm So Behind!

How did it get to be Friday already!? I had a goal, it was to consistently have 3-4 blog posts per week. Fail!

This week hasn't even been terribly busy, I've just been terribly lazy. Ok, not really. Between work and service and trying desperately to stay on top of housework I have been sort of busy. I will try to not let it cause me to slack so much in the future...

The one good thing about it being Friday already is that it's time for Friday Cocktails! I know that I said I was going to share Matt's new special drink last weekend, but he didn't get around to making it again so I couldn't snap a photo. Maybe he'll make one tonight while we watch the hockey game :).

Here's a nice fruity yummy drink!

The Mango Margarita


You will need:

  •  1 1/4 oz silver tequila
  • 1 oz triple sec
  • 1 1/2 oz freshly squeezed lemon juice
  • 2 oz simple syrup or sweet-and-sour mix
  • 3/4 cup partially frozen mango, unsweetened
Place all of the ingredients into a blender and blend until smooth. Pour into a hurricane style glass and garnish with mango and lime. Enjoy! 


This drink was so refreshing and had just the right amount of sweetness from the mango but didn't taste like a fruit smoothie, laden with sugar. I'm envisioning this drink in my hand...a white sand beach, clear water and not a care in the world:). 


I want to quickly share my new favorite nail polish that also happens to be a huge pain in the butt. It's Essie's Set in Stones. It's a glitter top coat that I looooove and is so pretty, but beware when it comes time to take it off. I got my thumb done and then I gave up. I'm going to suffer through chipped yucky nails til I can go for a manicure and have them deal with it. But the awesome sparklyness of it makes up for all that:).


I have it on over Essie's Clambake.
happy weekend!


Monday, March 26, 2012

What's the Difference Between and Lemming and a Lemon?

One is a small mouse like rodent that lives in the tundra (and are mistakenly believed to commit mass suicide when their population gets too big by running off cliffs, thus the birth of "don't be a lemming"), and one is a delicious fruit!

Ok, I'm really grasping at straws here for a beginning to this blog post. This may not be my best segue ever, but I'm doing it anyway.

I've been loving lemons lately. So when I saw a recipe for Citrus and Olive Oil Cake I knew I had to try it!

Something went a little wrong when I made this cake. I'm not quite sure what it was? I may have not beaten the sugar and eggs enough, or I may have put a little too much baking powder in. All I know is my bundt cake did not "rise" to the occasion...but thankfully I didn't mess it up enough for it to taste bad. It actually tastes really good.

Citrus and Olive Oil Cake


You will need:

  • 1 tbsp butter
  • 3 cups plus 2 tbsp all purpose flour
  • 4 eggs
  • 1 cup sugar
  • 1/4 tsp lemon zest
  • 3/4 cup extra virgin olive oil
  • 2/3 cup milk
  • 3 tbsp citrus flavored liqueur
  • 1 tbsp baking powder
  • 1 1/2 cups confectioners sugar
  • about 2 tbsp fresh squeezed lemon juice
Preheat oven to 325 degrees. Coat pan with butter and then flour, tapping out any excess. Set prepared pan aside.

Beat eggs and sugar together in a large mixing bowl, on medium high speed, until pale yellow, about 1 minute. Add remaining 3 cups of flour, zest, milk, olive oil and liqueur and mix with a wooden spoon until combined. Add baking powder and stir in.

Pour the batter into the bundt pan, smoothing out the top. Bake in oven for about 40 minutes, or until a wooden skewer comes out clean. Transfer the cake to a wire rack to cool completely, in it's pan.

Mix together confectioners sugar and  lemon juice until it's a good glaze consistency. Pour over the top of the cake after it has cooled.


Cut yourself a slice of cake, pour yourself a glass of milk and enjoy:).


Source: slightly adapted from Around the Table


Friday, March 23, 2012

Swap Time!

This round was another SRC-style swap, hosted by A Taste of Home Cooking. I'd like to take a minute and just say that I give her so much credit for putting these together. It seems like an awfully big undertaking and a very big commitment. So thank you! I really enjoy doing the swaps and appreciate all the time and effort you put into them:).

This round I received Ommy Noms food blog. I was so excited when I got my e-mail and saw this because I have made a couple things off her blog before and had more recipes bookmarked to make. Perfect! After some serious deliberation I decided to make her recipe for Maple Oatmeal Pancakes. I've been loving pancakes lately. I'll make a large batch and wrap them by two's, and stick them in the freezer for a quick breakfast that doesn't have to taste quick!

I'm a breakfast lover, it's a necessity for me. I can never get away with skipping breakfast like some can, or only survive on a cup of coffee and a banana. I need food! So when I'm in a hurry, or a half asleep state, it's nice to know I've got delicious pancakes in the freezer- one minute away from my enjoyment.

Maple Oatmeal Pancakes


You will need:

  • 1/2 cup all purpose flour
  • 1/2 quick cooking rolled oats
  • 1 tbsp brown sugar
  • 1 tsp baking powder
  • 1/2 tsp baking soda
  • 1/2 tsp salt
  • 3/4 cup milk
  • 1 tsp maple syrup
  • 2 tbsp vegetable oil
  • 2 eggs
Combine flour, oats, brown sugar, baking powder, soda and salt in a medium bowl. Add milk, oil, eggs  and maple syrup, stir until fully combined. I also added 1 tbsp of flax meal to the batter.

Lightly oil a non stick skillet over medium high heat. Pour batter into skillet, 1/4 cup at a time. Turn when bubbles form on the surface. Cook until second side is browned.


And how can you forget the final step?: Smother them in real maple syrup...mmm :).


Makes about 7-8 pancakes.

It was hard not to eat all 7 or 8 in one sitting...but I managed to display some self control and put some away in my freezer :).

Source: Ommy Noms Adapted from Allrecipes

Thursday, March 22, 2012

Keeping Your Heart Healthy

I'll be the first to admit that when I'm making a delicious dinner or decadent dessert "healthy" isn't always my first priority. I try to be more aware of the nutritional value of the foods we're eating, but other times I throw caution to the wind. Moderation is key ;).

It was when I saw this post over at The Jey of Cooking that I decided to make an earnest effort to make sure our dinners and snacks would be healthier, for real this time! (you've got to give me desserts though, I'm nothing without mascarpone cheese and fresh whipped cream :( ).

She'll be donating $1 to the American Heart Association for every entry of a heart healthy recipe in commemoration/celebration of her mom's heart transplant.

So here we go!

Grilled Chicken with Pineapple and Strawberry Salsa


You will need:

  • 2 slices fresh pineapple, patted dry, about 1/2 in thick
  • 1 cup whole strawberries, diced
  • 1/4 cup finely chopped red onion (I would omit this next time)
  • 3 to 4 tbsp freshly chopped mint leaves (I used 1 tsp dried crushed mint leaves)
  • 1 to 2 tsp sugar
  • 1/8 tsp crushed red pepper
  • 1 medium lemon
  • 4 boneless, skinless chicken breast halves (about 4 ounces each) all visible fat discarded
  • 2 tsp salt free steak seasoning blend ( I used Monteal spicy steak seasoning, but I don't believe it's salt free)
  • 1/4 tsp salt (I omitted this because my steak seasoning was not salt free)
Preheat the grill on medium high. Brush a grill pan or grill rack with oil. Heat the grill pan or rack for two minutes. Grill the pineapple on each side for about 2 minutes. Transfer to the cutting board and let cool before chopping.

Meanwhile, in a medium bowl, stir together the remaining ingredients except the lemon. Grate 1 tsp lemon zest, reserving the lemon. Stir the zest and chopped pineapple into the strawberry mixture. Set aside.


Sprinkle both sides of the chicken with seasoning and salt. Grill for 5 minutes on both sides, or until cooked through. Transfer to plates. Squeeze the reserved lemon over the chicken. Serve with salsa on the side.


We had the chicken with a spinach salad. Matt was not a fan of the salsa because of the onion, it was way too strong, and I agree. I would definitely omit it next time I make this. Otherwise he would have liked it and I would have enjoyed it a lot more. Also, I didn't halve my chicken breasts before grilling them on the grill pan. I grilled them and then just cut them in half. Next time, for the sake of saving grill time, I would halve them.

Overall it was very good, I really like the sweetness and freshness of the fruits with the mint over the spicy chicken. I loaded mine up with salsa since Matt didn't eat a lot of it:).


Source: slightly adapted from American Heart Association.

Calories Per Serving 191
Total Fat 3 g
Trans Fat 0.0 g
Monounsaturated Fat 1.0 g
Saturated Fat o.5 g
Polyunsaturated Fat0.5 g
Sodium 223 mg
Fiber 2 g
Protein 27 g
Cholesterol 66 mg
Carbs 14 g
Sugar 10 g
Dietary Exchanges- 1 fruit, 3 very lean meat

Tuesday, March 20, 2012

This Isn't Just Any Ordinary Tuesday

Today marks my 100th post!

Sometimes when I think about it, it doesn't really seem like much. Then I think back to when I started this blog in June of 2011, and how I don't really stick with anything, and 100 posts seems pretty awesome!

I started this blog on a whim, not really knowing how I would go about anything, and not knowing how long it would last. Now that I've conquered 100 posts, and conquering 1 year is just around the corner, I have to say...I'm sort of proud of it:). I've had my ups and downs. I've contemplated ending the blog, I've wondered what's the point. At the end of the day I enjoy baking, cooking and sharing things I've tried and loved or liked...or hated with anyone who's interested. I think this blog is just as much for me as it is for anyone else.

So let's have a drink to 100 blog posts:).

Bananas Foster Smoothie

You will need:

  • 1 very ripe banana
  • 1 oz rum
  • 1 oz Amaretto
  • 1 cup milk
  • 5 ice cubes
  • 1 tbsp banana Smoothie mix (if you don't have this, you could sub in 6 oz of vanilla or banana yogurt or a scoop of vanilla ice cream)


Combine all ingredients in a blender, blend until very smooth. Serve in a tall glass, topped with whipped cream and a cherry.

This weekend I'll debut one of Matt's new concoctions. I'll warn you, it's potent :). 

Wednesday, March 14, 2012

Happy Pi Day!

Celebrate Pi Day!

Pi, Greek letter (Ï€), is the symbol for the ratio of the circumference of a circle to its diameter. Pi Day is celebrated by math enthusiasts around the world on March 14th. Pi = 3.1415926535…
With the use of computers, Pi has been calculated to over 1 trillion digits past the decimal. Pi is an irrational and transcendental number meaning it will continue infinitely without repeating. The symbol for pi was first used in 1706 by William Jones, but was popular after it was adopted by the Swiss mathematician Leonhard Euler in 1737

Source: piday.com

Remember back in the day, when your math teacher let everyone bring in pie on Pi Day (even in 6th grade when we didn't know have a clue what Pi was)? Just one big party, full of pie. It was awesome! Well, I thought I'd revisit my school years and make some pie in honor of Pi Day.

I was actually shocked when I went to Wegmans yesterday and all of their pie ingredients and frozen pies were on sale, some things were actually running though. I bet Pi Day rivals Presidents Day in sales...

This recipe doesn't require a lot of ingredients, or a lot of time. I bought everything premade because, let's be honest, I just wanted to eat pie as soon as possible.

Mini Cherry Pies ...wait for it....On A Stick!

You will need:

  • 1 package pie crusts (2)
  • can of desired pie filling
  • lollipop sticks
  • cookie cutter 
That's it!

Unwrap pie dough and roll your pin over it a couple time gently to smooth down the edges. Sprinkl some flour on one side and flip over. Take your cookie cutter and cut out as many shapes as you can, keeping them close together. 


Place the pieces down on your baking sheet, lined with parchment paper, alternating so you have room for the stick. Place a lollipop stick down on each piece.


I chopped up my filling a little before putting it in the pies because I chose cherry and the cherries were sort of big, I wanted to be able to fit enough inside. Place a small dollop of your filling in each pie, making sure to not get to close to the edge.


Place another piece over the filling and use a broken off, short piece, of a lollipop stick to press down the edges, sealing them completely. If you get a little oozing out, just wipe it up with a paper towel and continue sealing.


Brush the tops of each pie with egg whites. Bake in a preheated oven at 375 degrees for 12-15 minutes. I kept mine in for the full length and maybe a minute longer.

I got 5 pies out of each circle of pie dough, without reusing the scraps to make more. I didn't know how well premade pie dough would hold up to that much kneading and rolling, but you could definitely do it and probably get 7 out of each circle.


How cute are these, right? I think they came out really well. To some the ratio of crust to filling is off for them, saying there isn't enough filling, but I thought it was perfect. This may be personal preference, or it was because I chopped the filling, so I was able to fit more inside. Also note that a few of the sticks seemed loose, so make sure when you're sealing your pies that you seal extra good around where the stick comes out of the bottom.


Perfect bite size pies!


These would be a great idea for a bridal shower favor, kids party or a baby shower! Especially because you can customize a little with the cookie cutter. You just want one that will have enough surface area to fit filling and be sealed.


So there you have it, my pie on Pi Day :). Hope everyone has a great day, and remember, it's all thanks to this guy:

3.
1415926535897932384626433832795028841971693993751058209 7494459230781640628620899862803482534211706798214808651 3282306647093844609550582231725359408128481117450284102 7019385211055596446229489549303819644288109756659334461 2847564823378678316527120190914564856692346034861045432 6648213393607260249141273724587006606315588174881520920 9628292540917153643678925903600113305305488204665213841 4695194151160943305727036575959195309218611738193261179 3105118548074462379962749567351885752724891227938183011 9491298336733624406566430860213949463952247371907021798 6094370277053921717629317675238467481846766940513200056 8127145263560827785771342757789609173637178721468440901 2249534301465495853710507922796892589235420199561121290 2196086403441815981362977477130996051870721134999999837 2978049951059731732816096318595024459455346908302642522 3082533446850352619311881710100031378387528865875332083 8142061717766914730359825349042875546873115956286388235 3787593751957781857780532171226806613001927876611195909  

Tuesday, March 13, 2012

Lemony Goodness

Do you want a simple, delicious, quick cookie? Ok great! Here's the perfect recipe for you:). I made these cookies per Stephs request and I'm really glad I did (Thank you Steph:)). They have the perfect amount of lemon flavor, are nice and chewy and it's pretty impossible to eat just one!

The original recipe calls for either agave nectar or honey. I happen to have a very large bottle of agave nectar from the last time it was on sale at Wegmans, so I used that. I still have some lemons left over so I may make a batch some time this week and use honey to see if there's much of a difference in taste. Also, half way through making these I realized with without the addition of eggs, these cookies are vegetarian (do vegetarians not eat eggs?) and could easily be made vegan with the substitution for the butter. More importantly it means you can safely eat all the unbaked dough you'd like! 

Chewy Lemon Snowdrops

You will need:
  • 1 3/4 cups all purpose flour
  • pinch of salt
  • 8 tbsp unsalted butter, room temp
  • zest of 2 lemons
  • 2/3 cup granulated sugar
  • 1/4 cup agave nectar or honey
  • 1 tsp baking soda
  • 2 tbsp lemon juice
  • about 1 cup powdered sugar, for coating
Preheat oven to 325 degrees. Line two baking sheets with parchment paper. Whisk together flour and salt in a bowl and set aside.

In an electric mixer, fitted with the paddle, cream together butter, lemon zest, sugar and agave nectar (or honey). Mix until very smooth, about 3 minutes. Make sure to scrap down sides.

In a small cup combine the lemon juice and the baking soda. With the mixer on low, add in the flour mixture and the lemon mixture. Scrape down the sides and mix by hand to ensure that all ingredients are evenly distributed.

Roll the dough into balls, 1 inch in diameter.


Make sure to spray your hand with a little bit of cooking oil so the dough doesn't stick too much. I baked the 2 sheets separately, 13 minutes each.


Let cool on baking sheets for 5-10 minutes and transfer to rack. The original recipe has you toss them in a bowl of powdered sugar but I opted to sift the sugar over top of the cookies. Simply because they are still pretty soft at this point and I didn't want any breaking apart in my hands and...cause they look prettier this way:).


Now pour a glass of milk and devour these cookies!


Source: sophistimom

Friday, March 9, 2012

Pasta Swap!

Matt and I could pretty much live on pasta, so when I saw that this swaps topic was "pasta dishes" I was pretty stoked. I received a recipe for Penne with Arugula in a Tomato Cream Sauce from Delish. Can we say yum?

When it comes to pasta, most every dish is a hit in this house, and this one did not disappoint! I would make this again and again. The only change I made was to use spinach instead of arugula. This wasn't by choice. Wegmans was out of arugula. I guess that's what I get when I go grocery shopping at 1:00 in the morning, everything isn't necessarily stocked. I also followed the link to some tips for the recipe by Mary Beth and followed one by adding 2 tbsp of vodka to the sauce.

Penne with Arugula (or spinach) in a Tomato Cream Sauce


You will need:

  • 1 tbsp olive oil
  • 3 oz Pancetta thinly sliced and chopped
  • 1 (14 oz) can diced tomatoes
  • 1/4 cup heavy cream
  • 3 oz Baby Arugula, chopped
  • 2 tbsp vodka
  • salt and pepper
  • 1 lb penne

Put a large pot of water on to boil for the pasta. Meanwhile, in a small saucepan heat oil on medium-high heat and saute the pancetta. When slightly browned and crisp, add the diced tomatoes. Simmer for 3-4 minutes. Stir in the cream, blending it. Simmer another minute, and then add the arugula. Simmer until the arugula wilts, and season with salt and pepper.

When the pasta water is boiling, add the penne and cook until al dente. Drain the pasta. Serve the pasta topped with the sauce.

So good. Make this:).

Source: Delish


Thursday, March 8, 2012

No Bake Energy Bites

For as long as I put off getting Pinterest, it's really paying off now that I have it. I've gotten so many good recipes and ideas! I'm sure without it I would find recipes just as well, but it really makes it so easy. I'm all about ease :).

I'm trying to keep healthier snack options in the house. Now that spring is almost upon us, I'll be taking out the clothes I packed away last fall....hoping they still fit me!

I found a recipe for "No Bake Energy Bites" and they looked like a good fit for a tasty, good for you snack. When making them again I think I will cut down on the amount of honey and maybe sub in some applesauce (no sugar added) because they are a bit too sweet for me. What I love about them is the endless amount of options when it comes to making these. You can really tailor it to what you like, and boost the protein, fiber and other goodness based on what you add.

Here's my version.

No Bake Energy Bites


You will need:

  • 1 cup oats
  • 1/2 natural peanut butter (no sugar added)
  • 1/3 cup natural honey (will reduce to 1/4 in the future)
  • 1/2 cup ground flaxseed
  • 1/4 cup chopped white and dark chocolate
  • 1/4 cup sunflower seeds
  • handful of chopped craisins
  • 1 tsp vanilla
Combine all ingredients in a medium bowl until fully incorporated. At first I was skeptical that it had to many dry ingredients to come together...but it does, just keep mixing:). 


I had chocolate discs that I roughly chopped, but you can also use mini chocolate chips (the higher the cocoa content the better).


Maybe my problem was just pouring the honey and not really measuring it:). I'll still reduce it, I'm a pretty good estimator.


Cover with wrap and let chill in fridge for at least 30 minutes. Once chilled, roll into 1 1/2" balls. Keep covered in fridge for up to a week.


I've been grabbing these out of the fridge for the past couple days and I'd say they do the trick. Just one of them curbs my hunger in between meals. They are best with a glass of milk:).


Since I had to grind the flaxseed for this recipe I decided to just grind the entire bag to keep in the freezer. Our coffee grinder worked really well and made a nice fine meal. Supposedly refrigerated  whole flaxseed keeps longer then frozen flaxseed meal, but I think the convenience of opening the freezer and grabbing a tbsp for my oatmeal is worth it. I'll use it faster then having to grind it each time anyway. I definitely wouldn't use it as often if it meant getting the grinder out and grinding up one measly tbsp at a time. 

Source: Smashed Peas and Carrots Go there for a list of great alternatives for ingredients:).

Saturday, March 3, 2012

Movie Night Gone Wrong

All except for the snack.

Matt and I were at the mall when we decided to go see The Lorax. I needed a nice feel good movie. While waiting in a ridiculously long line, we noticed the increasing amount of kids between the ages of 9 months and 7yrs gathering around us. "Lorax! Lorax! Lorax!" That's when I looked at Matt and we both said, "This is not a good idea" and left the line. Boo!

No movie, no popcorn, no obnoxiously priced "small" $6 pop.

Good thing this snack has been on my to-make list for a while! Also, I got to eat it in the silent bliss of my own home-Bonus!

Lorax will have to wait for another day. I'm thinking middle of the week, middle of the day :).

Peanut Butter and Honey Popcorn


You will need:

  • rounded 1/4 popcorn kernels
  • 2 tbsp vegetable oil
  • fine salt
  • 1/2 cup honey
  • 1/3 cup sugar
  • 1/2 cup peanut butter (free of added sugar)
  • 1/2 tsp vanilla
Put vegetable oil in a large pot over medium high heat with one kernel, and cover. When the kernel pops add the rest and shake the pot occasionally while the kernels continue to pop. When there are a few seconds between the pops remove from heat. Lightly salt the popcorn. 

Put a small saucepan on the stove and bring honey and sugar to boil, let simmer for 2 minutes and remove from heat. Add the peanut butter and stir until melted and completely combined. Stir in vanilla.

Immediately pour over popcorn and stir with a long wooden spoon. Let cool for 10 minutes before serving.


Matt wouldn't try this, I just made extra popcorn and put butter on his. Boooring. That meant I got to eat it all myself though, so I didn't mind too much :). It was really good, and surprisingly, not overly sweet. It's definitely a nice treat to have every once in a while.


Dig In!


Friday, March 2, 2012

Where Did This Week Go?

It's Friday already, let's make drinks!

This is my first Pinterest inspired blog post. I told myself I'd actually do at least some of the things that I pin, so here we go:).

I pinned this recipe for Lime Sorbet Margaritas and then altered it a little due to Wegmans not having plain lime sorbet, what's up with that? I ended up with Mojito Sorbet- lime with a hint of mint. I decided to still go along with the maragrita style drink, but add a couple different twists as well.

Here's what I made:).

Lime Sorbet Margarita

You will need:

  • 1 1/2 oz tequila
  • 1 scoop Mojito sorbet
  • lime wedge
Frozen Pink Grapefruit Cosmo

You will need:

  • 1 1/2 oz Belvedere Pink Grapefruit Vodka
  • 1/4 oz triple sec
  • 1 scoop Mojito sorbet
  • lime wedge
Frozen Look Out Below

You will need:

  • 1 1/2 oz Bacardi Rum 151
  • 1/4 oz grenadine
  • 1 scoop Mojito sorbet 
  • lime wedge
Cut a wedge of lime and rub around the edge of your glasses. Place sugar in a small bowl and turn glasses over into sugar to coat rim. Place a scoop of sorbet in each glass. Add liqueur according to the drink you're making. Finish each drink off with a squeeze of fresh lime juice. Serve with a spoon.


The color of the Look Out Below was really cool.


After taste testing each drink, and then going back again (just to be sure!), here are the drinks- most liked to least:
  • Frozen Pink Grapefruit Cosmo
  • Frozen Look Out Below
  • Lime Sorbet Margarita
It's sort of ironic how the original recipe was my least favorite. I feel like it may have been the hint of mint in the sorbet. It worked well with the flavors in the other two drinks, but not that one so much.

I think this is a really fun idea for a party, especially outside in the summertime. They're easy, refreshing, versatile and not too big or strong that you're one and done.

Enjoy!