Wednesday, June 29, 2011

Bridal Shower Cupcakes

*Sigh*

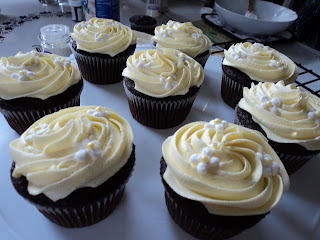
They're done!!! It's such a good feeling when you've finished a job and you can sit down and relax knowing everything went well. I'd like to thank the weather for not being a pain in my butt. I was anticipating 85 degrees and muggy for today, but it's actually perfect weather for baking and icing. So here are some pics. There's no recipes really but I'll add little bits of information along the way.


In the end I had 45 cupcakes, 22 vanilla and 23 chocolate. There has to be a gadget or a tool that perfectly measures out cupcake batter. No matter what I do I never end up with 24. I'm always 1 or 2 short. Thankfully it's not a huge deal in this case because I only needed around  40. I think I will look for an ice cream scoop, you know the old fashion kind with the lever, and that should fix my poor judgement skills when it comes to measuring out batter.


I used a large star tip #1M for the frosting, which was colored with a little bit of buttercup yellow and a little bit of lemon yellow. For the cupcakes with small white flowers I used a small straight tip #5.


I used Wilton White Nonpareils with Wilton pearlized Sugar Pearls on about half of the cupcakes. Then on the ones with little flowers I used the nonpareils and put a Wilton pearlized Yellow Sugar Pearl in the center of the flower. They're really simple but I think they are dainty and cute:).


They'll be put on my cupcake stands for the shower. I'm really happy these things have gotten so much use since I bought them for our wedding. They've been at bridal showers, baby shower, going away parties, retirement parties.... these stands sure do get around. I just threw a few on one to take a picture to get a feel of what they'll look like.
\


Alright, let's do a little product test. This is the Martha Stewart cupcake holder. In a word, it's awesome. It holds 24 cupcakes, is very secure, has a handy little handle. I bought this one awhile ago at the Macy's Home Store (confession: I bought it on black friday at like 6 in the morning) and have used it a few times and really like it.

When making the cupcakes for my sisters baby shower I needed two but didn't buy another and just put the others in a box. Since these are for a friend and I won't be delivering them and they're going to be traveling a few hours I thought they should all be in a carrier. Well, Martha's is $25.00. So, I was cheap and bought a Rubbermaid one at Target on sale for $17.99. It's fine and all but I should have spent the extra $7 and got another Martha one. The Rubbermaid one doesn't feel as sturdy and there's not as much room for taller cupcakes, frosting-wise. Also the bottom cupcakes sit in a tin and I have a feeling it'll be difficult to get them out w/o touching the frosting because they sit so low.

So yea- if you're in the market for a cupcake holder, get the Martha Stewart one, it's cuter anyway. Or just call me and borrow mine.


Now who wants to come and clean my kitchen!!!!!!????


Please and Thank You :)

Friday, June 24, 2011

Another Friday, Another Drink

I'm crawling out of my pit of sickness to do a Friday post. I'll be honest with you I could use a drink right now, but that probably wouldn't be a good idea given the amount of Ibuprofen and Amoxicillin I've been consuming in the past 5 days. I can't deny anyone else a drink though!

Grey Goose L'Orange Buonasola

Ingredients:
  • 1 part Grey Goose L'Orange flavored vodka
  • 3/4 part limoncello
  • 3/4 part dry Vermouth
  • 1 tsp superfine sugar
  • 3 parts orange juice


Fill cocktail shaker with ice and add all ingredients. Shake vigorously and strain into a highball glass filled with ice. Garnish with an orange slice.


Excuse my messy kitchen table....I'm sick!


Enjoy and Happy Friday!
*crawls back down into pit of sickness to watch UP*

"I told you no. N-O!"

Monday, June 20, 2011

The mother-load of all desserts

Are you ready for this? I think you are, I believe in you. You CAN do this!

Baklava

You will need
  • 1 lb. Filo Pastry Dough (Buy it in the frozen section at grocery store. Remember it needs to thaw for up to 8 hours or overnight, I have forgotten this once and believe me, microwave thawing it-doesn't work)
  • 3/4 lb Sweet Butter (unsalted), melted
  • 2 and 1/2 - 3 cups Walnuts and/or Almonds, finely chopped or ground
  • 2 tbsp. Granulated Sugar
  • 2 tsp. Cinnamon
Syrup Ingredients
  • 2 cups Granulated Sugar
  • 1 cup Water
  • 1 Cinnamon Stick
  • Juice from 1 Lemon slice
  • 1/2 cup Honey
In a saucepan, combine sugar, water, cinnamon stick and lemon juice over medium heat. Bring to a boil and simmer for 10 minutes. Add honey and return to boiling. Remove immediately from heat and set aside. Skim any foam off the top of the syrup if it's formed during heating.


In a small mixing bowl combine nuts with sugar and cinnamon and set aside.


Look at this glorious picture! That my friends, is 3 sticks of butter. Take it all in....and yes, you will be using all of it:).


Side note: When you unroll your Filo(Phyllo) Dough you can't leave it uncovered or else it becomes brittle quickly. I lay mine out on plastic wrap and cover it with more plastic wrap and then put wrung out paper towels over top of the plastic wrap. Also, make sure the wet paper towels don't touch it because it also gets gooey quickly and will all stick together. I also cut the dough in half before I start. Usually the first few sheets are scored and tear but after that you'll get one really long sheet. Just cut them down the middle.


Butter a 9" by 13" oven proof baking dish. Place a sheet of dough on the bottom of the pan and brush with the melted butter. Fold over any excess dough. Repeat process for another 8 sheets, buttering each.


Sprinke about 1/4 cu of the nut mixture evenly over the Filo and cover with 2 more sheets, buttering each. Continue sprinkling nuts every 2-sheet layer for about 4-5 layers. Use up your remaining nut mixture on last layer.


Use 8 sheets for the top layer, buttering each. Before buttering the last sheet, tuck in all loose edges or trim neatly and press down the layers with the palm of your hands. Pour remaining butter over top. I didn't really trim mine, but it all works out in the end. My favorite part is the edges anyway because they are extra crispy!


Cut into 5 strips lengthwise, about 1/2 inch deep. (just don't hit the bottom) Bake at 350 degrees for about 50-60 minutes or until golden brown. Remove from oven and immediately pour cooled syrup over baklava. Allow to cool thoroughly. Cut strips diagonally to form diamond shapes and serve!


I may or may not have snuck a piece before realizing I didn't take a picture of it. Oops!


Enjoy!


Friday, June 17, 2011

Summertime Cake

Here's a tasty summertime cake to make that's simple and refreshing. You can buy the Boden cake or make one yourself...if you have a Boden tin.(I bought mine) The recipe is as follows:
  • 1/2 cup sugar
  • 3 tbsp butter
  • 1 tsp vanilla
  • 1 egg
  • 1 cup flour
  • 1 tsp baking powder
  • 1/4 cup milk
Throughly grease boden tin and preheat oven to 350. In a large bowl beat together butter and sugar til white and creamy; add egg and beat til mixed in thoroughly. Sift together flour and baking powder and fold into the butter mixture, adding milk til it holds together in a ball. Press dough into a well greased boden torte pan (wet your hands with a little water to keep the dough from sticking to your hands). Bake at 350 for 15-20 minutes or until lightly golden. Remove from oven. Cool in pan on a rack for 15 minutes, then invert on a cake plate or other large plate.

For the filling I sliced some strawberries and mixed them with sugar and let them sit to do their thing and get all juicy.


Meanwhile I whipped up a half pint of heavy cream with two tbsp. confectioners sugar. I chopped up some mint and stirred it in with the strawberries.


I put a layer of whipped cream down on the cake and arranged the strawberries over top. Then poured the extra juice over it. Then filled a pastry bag, with star tip #18, up with whipped cream and piped a border.


This is a good dessert to make for a bbq or cookout, it cools you down on a hot day, and looks awfully pretty too.

It's Friday, go ahead, make yourself a drink

We'll pretend it's your first one this week, it's totally my first one... :). I'm going to try to do a weekly Friday segment featuring a different drink each week. Of course I have to start with my favorite- a Margarita! yummm. They are pretty simple to make.
  • 1 1/2 oz premium tequila ( I like Silver Patron. I've had margaritas with less expensive tequila and ones with more expensive tequila and Patron just makes a good margarita)
  • 1 oz Cointreau or triple sec (I use triple sec, only because we don't have cointreau, it's on the to-get list)
  • juice of half a lime and half a lemon
  • ice cubes
  • garnish: lime wedge
Shake the ingredients with ice and serve in a salt-rimmed margarita glass on the rocks, or strain to serve 'up' in a chilled, salt-rimmed cocktail glass. Garnish with the lime wedge.


You can also use a margarita mix such as margaritaville (one of my all time hated songs btw). Just follow the instructions on the label. It makes a good margarita when you don't have all the ingredients or the patience to squeeze lemons and limes.

I've tried a few different rimming salts and sugars and I just bought Franco's Cocktail Mixes margarita salt at Wegmans last week and it's pretty much awesome. Cut a little slit in your lime wedge and run in around the rim of the glass and then dip it in the salt and you get a perfectly salt-rimmed glass.

For those of you who are pregnant or breast feeding and want a drink without the alcohol here's a recipe for you.

  • 2 oz sour mix
  • 1 splash lime juice
  • 1 splash orange juice
  • ice cubes
  • garnish: lime wedge
Blend the ingredients with ice. Serve in a salt-rimmed margarita glass. Garnish with lime.

Enjoy and Happy Friday!

Wednesday, June 15, 2011

Have you made yourself an herb pot?

If not, get on it!!!
     
       I finished mine up on Monday. The chives and the mint came back from last year. The mint is planted in a separate pot embedded in the larger pot because of it's tendency to overtake wherever it's planted. I picked up some sweet basil, rosemary and parsley at Country Peddler on Monday morning. They were very healthy looking and at $2.69 a pop you can't go wrong.
      It's important to put herbs together that require the same amount of sun and water. I'd like to plant thyme but need a separate pot because they do better in dryer soil. I will transplant the rosemary in with the thyme because it also doesn't require a lot of water, as opposed to the others, who need the soil to be continuously moist.

Happy Herbing!

Tuesday, June 14, 2011

We all have those days

You know, the days when we literally have 10 minutes to throw a decent meal together for dinner, just so we can inhale it before we're on our way again. For me, that day is Tuesday. I leave at 11am and get home at 5:30pm and we have to be fed, washed, dressed, packed for work and off to meeting by 6:40pm. It's this day of the week that I choose the easiest, fastest meals that will still be satisfying and filling (it's gotta last til about midnight). So I thought I'd post a couple of go-to meals that maybe you'll find helpful when it's your "day".

A favorite in our house is pizzas. Remember, the point of this is time saving so there is no yeast or flour or cornmeal. Who has time for that? I use Naan bread for our pizzas. You can buy them at Wegmans. It's like $2.99 and you get two bread...things. This particular day we had no pizza sauce. Instead I brushed olive oil on both breads, got out my mandolin and sliced up some roma tomatoes(very thinly) and seasoned them.


I topped them with some mozzarella cheese and a mix of fontina, asiago, provolone and parm.


Bake them at 400 for 12 minutes.


And then serve on super classy paper plates:).


         I've been fortunate enough to have a husband who could literally live on pasta. I could make pasta every day and he'd be happy as a clam. The only thing preventing me from doing this is that I'd go crazy. This comes in handy for Tuesdays though:). I've started making this Tuesday morning so when I get home it just goes right in the oven.

I'll make the pasta...I'm assuming I don't need to go into detail for that part...and mix it with your sauce of choice. Always add more sauce then you would normally if you were eating it right away. It will need the extra liquid when it bakes. So if you like your pasta on the dry side, and bake it dry, you will get gross crusty pasta. Put into individual baking dishes and top with cheese and italian seasoning. At this point I cover it with foil, put them in the fridge and go about my day as usual.


 Fast forward 7 hours.....................


Preheat oven to 375 and bake uncovered for about 15-20 minutes or until cheese is melty and noodles are hot.

And you have a fancy looking pasta dish in no time at all! I stopped at Panera and got an asiago cheese loaf in between working. It doesn't hurt to get yourself a cute set of potholders to serve these on, you'll need 'em.

**to remember-keep toes out of future photos

Monday, June 13, 2011

When I think of summer foods...

I immediately think of fresh herbs and everything grilled. Not to say you can't have fresh herbs in the winter, but I don't bring them in the house for the winter so if I want them, I buy them.
Summer is, by far, my favorite time of year to cook. Today I made a delish caprese salad with fresh mozzarella balls, fresh basil, tomatoes, some red onions(not too many, or else Matt wouldn't eat it), a little bit of balsamic vinegar and olive oil. It's so easy and it tastes so fresh!


I picked up some bone-in center cut pork chops at Country Peddler this afternoon and was soooo excited to grill them. All I did was brush some evoo on them, salt, pepper, thyme and rosemary. Simplicity is best when it comes to grilled food in my opinion.
They cooked for about 12-15 minutes on medium/low heat. I'm working on my grill lines. I remember watching a show on how to get the best grill lines (yes, a show on grill lines and I watched it). The pork chops were so juicy and good:). The salad gave me horrible breath from the onions but was so worth it!
In other food related news- I finally got my produce bags!!!! I ordered them from Love for Earth on Etsy on the 1st. Shipping was estimated at 4-8 days. I was planning on e-mailing to make sure my order didn't get lost today if they didn't come. But here they are! I can't wait to use them. Of course I picked up most of my produce today at C.P. but oh well.

Sunday, June 12, 2011

Our love of food


I'm going to ease into the blogging world with a simple post. When I think of the best food experiences I've had I immediately think of my honeymoon. Matt and I ate...and ate..and ate. Oh yes, and drank:) Here are just a few of the delicious foods we enjoyed in Quebec.


On our second day we ended up having lunch at a small pizzeria/cafe right in the middle of the lower city. We both had some of the best pizza. Matt was even so bold as to say it was comparable to the pizza he had in Italy. Thin crust, minimal sauce, melty cheese, basil, red pepper flakes and a little olive oil drizzled on top and voila! Now pair it with a nice cold Killians and you're in food heaven:).


I don't think we turned down dessert once while we were there. When asked if we would like dessert it was an immediate "Yes!" from us:) Up above is the best tiramisu I've ever had in my life, as short as it is. We've searched for tiramisu high and low to compare with it and have yet to find any.


We frequented a dessert shop called Gigi's. Here are a few of the treats we got. They were all small and simple but sometimes the best and most enjoyable things are!