Thursday, December 29, 2011

I Have To Share This!

I made this meal last week and it took everything I had to not inhale it because I loved it so much! I got the recipe from Wegmans. They were featuring it in their stores by the seafood section and I went on-line to get the recipe in full. The original called for Cod but the price per lb. of Cod was a bit steep for me, so I went with Tilapia instead. I also omitted the sauce that they called for in the recipe and was glad that I did, I feel like it would have masked the flavor of the fish and prosciutto, which in my opinion is flavor enough.

Pan-Seared Prosciutto-Wrapped Tilapia


You will need:

  • 4 slices prosciutto
  • 2 fresh sage leaves
  • 2 fillets tilapia (about 6 oz each)
  • pepper
  • pan searing flour
  • olive oil
  • butter 
  • garlic
Lay 2 slices of prosciutto on clean working surface. Place sage leaf on each and place fish on top. Wrap the prosciutto around the Tilapia and use your second slice of prosciutto to cover over the top and overlap on the sides. Dust both sides with pan-searing flour.

Heat olive oil in a pan on medium-high heat. Add Tilapia packet, sage leaf side down. Turn over when Tilapia has changed color one quarter of the way up and seared side has turned paper bag brown, about 5 minutes.

Reduce heat to medium and cook about 4 minutes longer, until internal temp has reached 120 degrees. Add one tbsp butter,  1 tsp parsley and 1 tsp minced garlic to pan and swirl around. Baste for 1-3 minutes until internal temp reaches 130 degrees.

Transfer to clean platter and let rest for 2 minutes before serving.

Source: Wegmans

Every time I buy prosciutto I end up using only half of a package and I end up tossing the rest because it never gets used. I was determined to not let that happen this time. I ended up making strip steaks 2 days later and I picked up some asparagus to go with it. Matt is not a huge fan of asparagus but....wrapped in prosciutto, anything tastes good :).


I wrapped the asparagus in bunches of two and drizzled them with some olive oil and put some salt and pepper on the ends. Bake them at 400 degrees for 8-10 minutes.


As a bit of a product review, I got this cast iron grill pan at Macy's two weeks ago. It's the Emril 10 inch grill pan. We have a George Foreman that I like to use for burgers and such during the cold weather months, but it doesn't give the meat a nice color and I feel like it doesn't hold the seasoning very well.

This pan worked really great, and it's nice to be able to cook the meat on high heat to get a nice browned crusty outside and then stick the whole thing into the oven and slow cook the middle. At $20 (on sale) you can't go wrong. I think it comes out to $1 per pound hah, this thing is heavy! I finally returned my dutch oven that was recalled and received a gift card for the value, so I was able to get this and a few other things!


Sorry, this picture is really crappy. The food was delicious though- not pictured is the glass of red wine that you have to have with steak, I mean come on! We don't eat steak very often so when we do it tastes extra good :).


Saturday, December 24, 2011

Sugar Overload!

I sort of got caught up in a sweets frenzy and all I want to do is make cute sugary things. Maybe this is a precursor to a vegetable frenzy...yea I didn't think so either :). It's been fun though, I've enjoyed making new things and trying out new flavors and decorations. So long as I'm able to give the majority of what I make away I'm good with it!
This post contains a few things I've made over the past few days. Some pretty easy, some super easy, but all really good!

Oreo Truffles


You will need:
  • 1 package Oreos
  • 1- 8 oz package cream cheese, softened
  • 2-3 cups chocolate discs, milk or dark chocolate
Crush all but 7 cookies in a food processor, or in a bag with a hammer if you're having that sort of day. Blend in cream cheese until it comes together in loose chunks.

Roll into 1" balls and place on a baking sheet covered in wax paper and put them in the freezer.

On a double boiler, melt down your chocolate discs and then dip the balls into chocolate, tap of excess and lay on wax paper to dry. You can sprinkle them with the remaining cookies crushed, crushed candy canes, sprinkles- the options are endless. Make sure you sprinkle as you go because the chocolate will begin to harden quickly since they were in the freezer for a while.


Some of mine were a bit bigger then an inch. Oops :) I sprinkled them with white non-perils.


I happened to have some pretzel rods laying around and I didn't want the leftover chocolate going to waste. How convenient! I topped them with some non-perils and crushed candy canes.


These chocolate laden treats should be enjoyed sparingly. Don't want to get chocolate wasted now, do we friends?


Source: Bakerella


On to more cupcakes, cause you know, I can't get enough of them! It's a sickness. They're on my mind all the time and now that I went to the new cupcake shop in Orchard Park my mind is reeling with ideas for cupcakes...and how much better then theirs they'd be...There! I said it.

Turtle Cupcakes

Make your favorite chocolate cupcake and icing recipe, at this point I'm not going to post chocolate cupcake recipes, it seems redundant. If it were a special recipe I would but these are just plain chocolate cupcakes.

You will need:
  • 1/2 cup heavy whipping cream
  • 1 tbsp caramel sauce
  • 1/4 cup coarsely chopped pecans, roasted or not.
I made a caramel whipped cream to fill the cupcakes and topped them with a mound of frosting. Sprinkle chopped pecans over top. Fill a bag with caramel sauce and cut a teeny tiny hole and crisscross the caramel over top.


That's for about 12 cupcakes, double for a batch of 24.

Chocolate Mint Cupcakes

You will need:
  • 1/8 tsp mint extract
  • 1/2 cup heavy whipping cream
  • red food coloring
  • crushed peppermint candies
  • sprinkles
This is pretty much the same deal, except I mixed the extract and food coloring into the whipped cream, filled the cupcakes, frosted them and then sprinkled sugar crystals and crushed candy canes over top. You could also make these and chop up refrigerated Andes Candies and put those on top, and make the filling green to match instead of red. 

I pretty much go to Olive Garden for the Andes Candies :).


I made these a day ahead of time for the flavors to intensify. Make sure you don't store them together, otherwise you'll get some strange turtle cupcakes with a hint of mint. Yuck. Keep them refrigerated due to the cream filling.


Tuesday, December 20, 2011

Treat Yourself!

Look at these cute cupcakes!

Black Forest Cupcakes

I filled 24 chocolate cupcakes with a cherry whipped cream. I just whipped up some cream and blended about 2-3 tbsp of cherry pastry filling into it. Make sure your filling doesn't have large chunks of cherry, you may want to chop it up some if it does.


I topped them with a creamy whipped frosting. A Swiss Meringue Buttercream frosting works well.


Some mini chocolate chips.


And a maraschino cherry that's been drained and patted dry with a paper towel.


They're so adorable!


Here's a photo of the center. These were best the second day, the cherry flavor had some time to seep into the chocolate cupcake.


How easy is that? I love the way they look almost as much as the way they taste :). Oh, and make sure to keep them refrigerated!

Friday, December 16, 2011

Recipe Swap: Chocolate Gingerbread Cookies

This was my first time participating in the recipe swap, put together by Sarah at A Taste of Home Cooking. I'm not going to lie, I was nervous. Both about how my submission would be received and about what recipe I would receive. I submitted the oatmeal cookies I did a couple posts ago, and got these chocolate gingerbread cookies from Cathy at Cathy's Kitchen Journey.

So, without further ado...

Chocolate Gingerbread Cookies


You will need:

  • 1 1/2 cups plus 1 tbsp flour
  • 1 1/4 tsp ground ginger (I actually did 1/4 tsp by accident, but it didn't leave them lacking any flavor)
  • 1 tsp ground cinnamon
  • 1/4 tsp ground cloves
  • 1/4 tsp ground nutmeg
  • 1 tbsp unsweetened Dutch process cocoa powder (I used Hershey's cocoa powder...it's what I had, sorry!)
  • 1 stick butter at room temperature
  • 1/2-1 tbsp freshly grated peeled ginger
  • 1/2 cup packed brown sugar
  • 1.2 cup unsulfered molasses
  • 1 tsp baking soda
  • 1 1/2 tsp boiling water
  • 1 cup semi sweet chocolate chips ( I used mini)
  • 2 tbsp sugar, for rolling
In a bowl, sift together flour, ground ginger, cinnamon, cloves, nutmeg and cocoa powder. Set aside.

In your mixer, using the paddle atachment, beat butter and grated ginger for 4 minutes until light and fluffy. Beat in sugar to combine well, then beat in molasses.

Add half of the flour mixture to the butter mixture. Mix well.

Combine baking soda with boiling water. Beat into batter. Add the remaining flour to the batter and beat to combine. Mix in chocolate chips.

Refrigerate 2 hours or overnight.

Preheat oven to 325 degrees F. Spray two cookies with cooking spray, or line with parchment paper.

Using cookie scoop, scoop out dough and roll into 1 1/2 inch balls. Roll them into sugar and place 2 inches apart on cookie sheet.

Bake  for 10-12 minutes in preheated oven, rotating half way through, until surface begins to crack. -My cookies were on the large side and ended up taking about 15 minutes.- Let cool on cookie sheet for 5 minutes before transferring to wire racks to cool completely.

Store in airtight container for up to 5 days at room temperature.

Makes about 2 -2 1/2 dozen.

This is actually my breakfast this morning as I type this post:).

These cookies are a great spicy treat! They have a nice kick from the ginger, cloves and molasses, and a gooey sweetness from the chocolate chips. Matt and I both enjoyed a couple right out of the oven Mmmm:).

A big thanks to Sarah for arranging the swap and Cathy for the delicious cookie recipe!

Source: Cathy's Kitchen Journey, adapted from Martha Stewart's Cookies

Tuesday, December 13, 2011

What Was I Thinking?

Have you ever agreed to something, volunteered for something, been volunteered by someone else for something? Then you realize all those things are in the same week and your mind explodes?

*raises hand*

I've gone through so much butter, sugar, eggs and flour in the past week and a half it's ridiculous. My mixer has been getting a good work-out, unlike me:). This past Saturday I made pecan bars for the lunch for the pioneers (This was one of the things someone volunteered me for:), I was happy to help though). I was a little nervous since I have never made them before, but I think they turned out really well.

When I think of a pecan bar I picture a flaky buttery crust, a soft sugary center (preferably with bourbon in it- yum!), and then a nutty crunchy top. These were a little more crispy/crunchy, the nuts were mixed into the sugar and butter topping so it was two layers instead of three. The crust was just as I imagined though, melt-in-your-mouth good:) I would like to try another recipe I found for them at some point, just to compare.

Pecan Bars


For the crust you will need:

  • 1 1/2 sticks cold unsalted butter, cubed, plus more for dish
  • 1 1/2 cups all-purpose flour
  • 2/3 cup light brown sugar
  • 1 tsp kosher salt
Filling:
  • 1 stick unsalted butter, softened
  • 1 cup light brown sugar
  • pinch salt
  • 1/3 cup light corn syrup
  • 1/4 all-purpose flour
  • 3 cups coarsely chopped pecans
Preheat oven to 350 degrees.

Line a 13 by 9 inch baking dish with tin foil allowing an overhang about 2 inches off the sides. Butter the foil.

In a food processor, blend together flour, sugar, butter and salt until the mixture resembles coarse sand. Add 2 tbsp cold water and mix until the down just holds together.


Press the dough into the bottom of the buttered dish and bake in oven until golden in color, about 20-25 minutes. *A big thanks to Matt, who found the piece that fits over the shute in the lid so things don't go flying out of it whenever I run it.*

Meanwhile, make the filling. In a stand mixer fitted with the paddle attachment, add the butter, brown sugar and a pinch of salt and mix on medium speed until light and fluffy, about 3 minutes. Add the corn syrup, flour and pecans and mix until just combined.


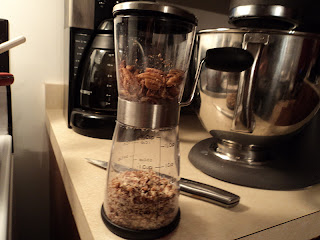
I need to show Matt that I actually use that Nut Chopper we registered for:)!! It is pretty nifty.

Spread the filling over the baked crust and bake until golden brown, about 30-35 minutes. remove the dish from the oven and allow it to cool completely in the pan.


Remove from pan by pulling up the foil sides and putting it on a cutting board. Cut bars in desired size with a sharp knife and arrange them on a serving tray.

Tips and Reminders:
  • Make sure your butter for the crust is cold. Try not to handle it too much while cubing it, allowing it to soften. 
  • Fill a cup with cold water and a couple ice cubes to use for the crust. I added 1 tsp extra for it to come together. 
  • I checked it at 30 minutes and let it go to 35. This was a mistake. The edges were a little overcooked and I had to trim them off. Depending on your oven, I would go with the shorter time, it will continue to cook a little in the pan after you take it out of the oven anyway.

Enjoy!


Source: Claire Robinson at FoodNetwork.com


Monday, December 12, 2011

Lighten The Load

As you know, I'm a sucker for Starbucks seasonal drinks. Lately Matt and I have been going a lot and I'm starting to feel the guilt from all those peppermint mochas. I still haven't gotten over all the pumpkin spice latte guilt from Fall.

I thought I'd do a lighter version of the Caramel Brulee Latte. This is Matt's seasonal drink of choice right now and although the calories don't mean a thing to him, I thought it'd be fun to make them at home and lighten them up a bit.

I actually don't even like the Caramel Brulee Latte at SB. It's way to sweet for my liking and the flavors are a little too chemically tasting for me. I really enjoyed this at home though. It had just the right amount of sweetening for me, the caramel flavor was strong and it had just a hint of vanilla.

A tall 12 oz Caramel Brulee Latte at Starbucks, made with whole milk and no whipped cream is 300 calories. After doing some math (eek!)- this drink is roughly 160 calories. You're also getting more then the 12 ounces you'd get in a tall drink at SB. All in all, I think it's a great substitute. Also, you can always use 1 or 2% milk instead of whole and that will reduce the calories by about 30 more. As a side note, I didn't use espresso. I'm eyeing this espresso maker right now. It was on sale a couple weeks ago for a really good price, I probably missed my opportunity :(. For the time being, I just brewed coffee on the strong setting. You could also make it in a french press and that will give you a stronger brewed coffee.

Caramel Brulee Latte

You will need:

  • 1 cup strong brewed coffee 
  • 1/2 cup steamed milk
  • 1 tbsp caramel sauce
  • 1/8 tsp vanilla extract
  • additional sugar, if desired (I added 1 tsp sugar in the raw)

Simply brew your coffee and fill your mug 1/2 way, approximately 1 cup, depending on the size of your mug. Add caramel sauce, vanilla, sugar and stir.

Heat the milk and froth it, you can whisk it to help froth it up if you don't have a frother or emulsifier with whisk attachment, but you may not get a very good amount of foam (look here for an idea on how to froth without a frother!). Add milk, holding back foam. Spoon the foam onto your coffee and drizzle with caramel if you'd like. Enjoy!


I give it an A+. It was really great :). Just think- you have two and it'll still only be as bad as one from SB!

Saturday, December 10, 2011

Bon Appetit!

This months Bon Appetit magazine is full of cookies to die for. One of my favorite being Meringue Cookies! I made a batch, according to their recipe, although I did half peppermint and half plain.

Peppermint Meringues


You will need:

  • 3 large egg whites, room temperature
  • 1/8 tsp kosher salt
  • 1/3 cup sugar
  • 1/2 cup powdered sugar
  • 1/8 tsp peppermint extract
  • red food coloring
Preheat oven to 200 degrees. Line a baking sheet with parchment paper. Using an electric mixer, beat egg whites and salt until white and foamy, about 1 minute on high. With mixer running, add the sugar in three additions, beating for 2 minutes in between each addition. Beat until firm peaks form, about 2-3 minutes longer. Add powdered sugar and peppermint extract and beat to blend. (I held off on adding the peppermint extract in order to do half of them plain.)

Spoon meringue into a pastry bag fitted with a 1/2 inch tip. Twist top; pipe 1 inch rounds onto prepared baking sheet.

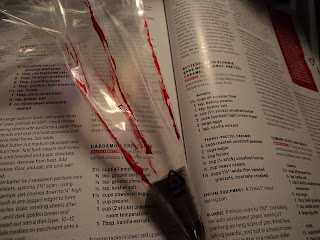
Once I did half of the meringue, I then added the peppermint extract (a little less then1/8 tsp) and blended it. I took a clean paint brush and painted stripes up the sides of a new pastry bag. If you don't want to do this you can just put a couple drops of coloring into the bowl and swirl it, but not blend.


Fill the bag with the remaining meringue and continue piping your 1 inch rounds onto the baking sheet. Makes about 60. Bake meringues until dry, about 2 1/2 hours. Let cool completely, about 1 hour (meringues will crisp as they cool).


They can be made 2 days ahead. Store in an airtight container at room temperature.


These cookies are great for a sweet, low calorie and fat free treat! You don't have to feel to bad about eating one, and then 6 more:).


Wednesday, December 7, 2011

Mac 'n' Cheese! Mac 'n' Cheese!

**Edited** After re-reading what I had here a few times I realized it sounded...weird.

Today I decided to make some cholesterol raising, artery blocking, heart attack inducing mac 'n' cheese. It's not really that bad, it could be worse for you.

Macaroni and Cheese


You will need:

  • vegetable oil
  • kosher salt
  • 1 lb elbow noodles
  • 1 qt whole milk (4 cups)
  • 8 tbsp unsalted butter (divided)
  • 1/2 cup all purpose flour
  • 12 ounces Gruyere, 4 cups grated
  • 8 ounces extra sharp cheddar, 2 cups shredded- I used Yancey's Fancy xxx sharp white cheddar cheese, soooo good:)
  • 1/2 tsp freshly ground black pepper
  • 1/2 tsp ground nutmeg
  • 3/4 lb fresh tomatoes (4 small)
  • 1 1/2 cups fresh white bread crumbs- I used panko bread crumbs instead
Pre heat oven to 375 degrees. Drizzle oil into a large pot of boiling salted water. Add the macaroni and cook according to the directions on the package. Drain well. 

Mean while, heat the milk in a saucepan, but do not bring it to a boil. Melt 6 tbsp of butter in a large 4 qt pot and add the flour. Cook over low heat for two minutes, stirring with a whisk. Add the hot milk while whisking continually and cook for an additional one or two minutes more, until thickened and smooth. Remove from heat and stir in both cheeses, 1 tbsp of salt, pepper and nutmeg. Add the cooked macaroni and stir well. Pour into a 3 qt baking dish.


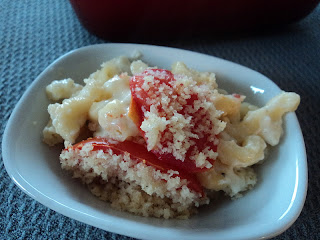
Slice tomatoes thinly and arrange on top.


Melt remaining butter, combine it with the breadcrumbs, and sprinkle over the top. Bake for 30 or 35 minutes, or until the sauce is bubble and the top is browned on top.

I actually cut this recipe in half when I made it and it worked out just fine. The recipe I put here serves 6-8. Matt and I obviously don't need that much mac 'n' cheese laying around. Well, maybe Matt does, but I don't!
It was easy to halve everything since all the measurements are pretty even, nothing to obscure that requires too much math:).


Dig in!


Source: Ina Garten: Food Network- I know, I know. I can't stay away from her.

Thursday, December 1, 2011

Perfect Oatmeal Cookies

I've been craving oatmeal cookies lately. I think they are the perfect cookie for when you want something sweet, but not overkill. A cookie that you don't have to feel to guilty about indulging in:). A hearty, homey, good old fashion oatmeal cookie!

I think these are a great cookie to make with kids. There's minimal mess, a few simple ingredients and you can let them get their hands into it a little bit (washed of course!!).

Martha Stewart came to the rescue with a good recipe that I tweaked a little, just to make them a bit more interesting.

Oatmeal Cookies

You will need:

  • 1/2 cup all purpose flour
  • 1/2 cup whole wheat flour
  • 1 tsp baking powder
  • 1 tsp ground cinnamon
  • 1/4 tsp ground nutmeg
  • 1/3 cup vegetable oil 
  • 2/3 cup packed brown sugar
  • 1 large egg
  • 1 tsp vanilla 
  • 1/2 cup rolled oats (not quick cooking)
  • 1/4 cup craisins
  • 1/4 cup golden raisins
Makes about 12-15 cookies

Preheat your oven to 350 degrees. In a medium sized bowl combine the flours, baking powder, cinnamon and nutmeg; set aside. In a large bowl combine the oil, sugar, egg and vanilla. Add flour mixture and stir to combine.


Mix in the craisin, raisins and oats until they are fully incorporated.


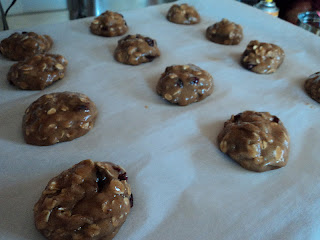
Using about 2 tbsp of dough per cookie, roll into balls; place onto a baking sheet lined with parchment paper. 1  1/2 inches apart. It helps if you put a little cooking spray onto your hands before you roll the dough, that way it won't stick all over your hands. Bake until lightly browned, 15-17 minutes, spinning the sheet half way through. Cool 5 minutes on sheet and then transfer to a wire rack to continue cooling.


You'll know how good they will taste by how amazing your house will smell:)


 And then you'll eat them and your suspicion of their tastiness will be confirmed.


Friday, November 25, 2011

Ooey Gooey Goodness

Oh Ina Garten, you've done it again. You've won me over with your delectable desserts. I may find you unbearable to watch but I can't deny that you know what you're doing in the kitchen.

 I thought this recipe was a nice variation of your typical apple crisp, with the addition of pears. I intended to add golden raisins but completely forgot about it until I had put the topping on. I was pretty bummed about that, I really think it would have given it a lot more flavor, but it was very good without them also.

Apple and Pear Crisp


You will need:

  • 2 lbs ripe Bosc pears (4) (mine were pretty firm but it made them easy to peel and keep their form during baking)
  • 2 lbs firm Macoun apples (6)
  • 1 tsp grated orange zest
  • 1 tsp grated lemon zest
  • 2 tbsp fresh squeezed orange juice
  • 2 tbsp fresh squeezed lemon juice
  • 1/2 cup sugar
  • 1/4 cup flour
  • 1 tsp cinnamon
  • 1/2 tsp nutmeg
For the topping:
  • 1 1/2 cups flour
  • 3/4 cup sugar
  • 3/4 cup lightly packed light brown sugar
  • 1/2 tsp salt
  • 1 cup old fashion oatmeal (not instant)
  • 1/2 lb (2 sticks) cold unsalted butter, diced
Preheat the oven to 350 degrees. Peel, core and cut the pears and apples into large chunks. Place the fruit in a large bowl and add zest, juices, sugar, flour, cinnamon and nutmeg. Combine until fruit is evenly covered. Pour into a 4 qt. baking dish.

For the topping, combine flour, sugars, salt, oatmeal and butter in the bowl of an electric mixer. Mix on low speed for one minute, or until mixture is in large crumbles. Spread evenly over fruit, covering it completely.

Place the baking dish on a sheet pan and bake for 50 minutes to 1 hour, until the top in brown and the fruit is bubbly. Serve warm with fresh whipped cream or ice cream.


I made it a day ahead of time and then we reheated it for about 30 minutes at 200 degrees. I think that may have caused it to get a bit liquidy but it was worth it to have warm crisp with ice cream :).

Source: Ina Garten- The Barefoot Contessa

Saturday, November 19, 2011

There's Nothing Cuter Than A Cupcake!

I love a perfectly frosted cupcake. There are beautiful cakes and delicious looking pies and tarts, but nothing beats a cupcake for me.

I had the cupcake itch earlier this week and Matt suggested lemon raspberry cupcakes (his favorite combination). I really wanted to do a black forest cupcake, but I decided on the lemon/rasp. I'm a good wife like that ;).

For the decoration I wanted to do something other then just flowers, pearls or dragees. I thought it would look nice and simple to make candied lemon peel and use that for decoration.

Candied Lemon Peel

You will need:

  • 3 lemons
  • 2 cups water
  • 2 cups sugar
Peel your lemons with a veggie peeler, make sure to not peel any of the pith (white sour part under the peel).


Meanwhile, bring your 2 cups of water to a boil. When it's reached a boil, add the lemon peels and boil for about 5 minutes, or until tender. Remove the peels and add in your 2 cups of sugar. Once it has returned to a boil, add the lemon peels back in and boil until translucent. Mine could have been cooked a little while longer maybe. Remove the peels and let dry completely before storing. I sprinkled them with some additional sugar to give them a little extra sparkle.


The syrup can be save and used as lemon simple syrup for recipes or cocktails. I grabbed an empty liqueur bottle, washed it out and funneled the syrup into it after it had cooled for a while. That night I made a lemon drop cocktail. Yum!


Source: allrecipes.com

On to the cupcakes! I just made a box recipe of lemon cupcakes. After they had cooled, I took my tip #230 and filled a pastry bag with raspberry jam. I was nervous about exploding one or two of them but thankfully that didn't happen. It was pretty easy to see the cupcake rise a little as it was filling out with the jam.


Here they are, all filled and ready to be frosted!


I used the Wilton butter cream recipe. Normally I use shortening and water, but I had some softened unsalted butter so I made one batch with butter and milk and a second with shortening and milk. I think the milk gives it a better flavor than the water, but to be honest I prefer the shortening to butter. I just whipped the two batches together at the end.


Cupcakes are just so happy to me:).


I sprinkled some Wilton white sparkling sugar on the cupcakes and then topped them each with a candied lemon peel.


"Eat Me!" 
I will edit this post later today. Matt's going to eat one before we take them to the party and I'll post a picture of it cut in half to see what the filling looks like from the inside.


Here's a picture of the cupcake cut down the center. Matt gives them 2 thumbs up.


Tuesday, November 15, 2011

I'm Married to a Serious Carnivore

Therefore, not many of the meals I make don't contain meat. I've made this veggie chili a few times though, and it's gone over pretty well. I've made other veggie chilis and they have not been nearly as good as this one. It's sort of my vegetarian standby. I'm going to try and branch out a bit more to expand my vegetarian repertoire.

Veggie Chili


You will need:

  • 2 cloves garlic, minced
  • 2 stalks celery, chopped
  • 1 can diced tomatoes
  • 1 can tomato paste
  • 2 cans (tomato paste) of water
  • pinch of cayenne pepper
  • 3 tbsp chili powder
  • 2 tbsp brown sugar
  • 1 can of kidney beans (drained and rinsed)
  • 1 can of black beans (drained and rinsed)
  • 1 cup frozen corn
  • 1 pkg sliced mushrooms
  • 1 medium onion chopped
Heat olive oil in your pot and add onions, celery, mushrooms and garlic. Cook for 5-10 minutes, or until veggies are tender.


Add diced tomatoes, tomato paste, 2 cans water, cayenne pepper, chili pepper and brown sugar. Bring to a simmer and cook for 30-45 minutes.


Add both cans of beans and frozen corn. Bring back to a simmer and cook for an additional 30 minutes.


Top with cheese, sour cream or if you really like to live on the edge-both! We had them with Garden of Eatin' Blue Chips. Go to their website for a $1 off coupon!


As you can tell, it's super simple. Most chili's are I think, but it really is quite good, and very filling.

Source: I've adapted it from a recipe that Janine gave me. It was her Aunts recipe, but I have no idea of it's origin before that.